Sliding doors are a beautiful addition to any home, offering easy access to outdoor spaces while providing plenty of natural light. But like all home components, they’ll eventually wear out and need to be replaced.
A few signs that it’s time to invest in Sliding Door Replacement include condensation between the glass panes, gaps around the door, and poor energy efficiency. Contact Sliding Door Replacement Austin Texas for professional help.
Sliding glass doors are a beautiful addition to any home, but they can also be a hazard. Even small cracks in the glass can pose a threat to your family’s safety, as they may break and shoot shards of glass throughout the room. This is why it is essential to have your sliding door’s glass replaced as soon as you notice any damage.
If you are not sure what to do when your sliding door’s glass breaks, you can take several steps to prevent further damage and keep your family safe until a professional can arrive for repair or replacement. First, you will want to assess the extent of the damage and determine if it is repairable. This will involve examining the glass pane, the frame and the hardware to determine what caused the broken glass and how severe the damage is.
Most modern sliding door glass is made from double pane insulating glass that is held together with a primary seal to help keep moisture out and maintain a clear view of the outdoors. However, it is not uncommon for this seal to fail and lead to cloudy fogged glass that impedes your view. This is one of the most common reasons homeowners call for sliding glass door replacement.
While this type of glass is insulated to reduce heat loss, it can still be vulnerable to cracks or chips that need to be repaired with a professional. It is important to check the glass frequently, especially if you have children or pets in the house, and replace it immediately if it becomes damaged.
Proper handling and operation of a sliding glass door can also prevent damage. Avoid using excessive force to open or close the door, and teach your family members how to gently handle it. You can also consider upgrading your existing glass to impact-resistant glazing, which is specially designed to resist breakage from extreme weather conditions or break-ins. Contact a professional for more information on this option. This is an excellent upgrade for homes in high-risk areas. It will not only improve your home’s appearance but also increase its value.
Misaligned Frame
Over time, the frame that supports your sliding door can become misaligned. This can lead to uneven gaps and makes it hard for the door to open or close. Luckily, a little adjustment can fix this problem.
Misalignment in the frame may be caused by foundation settling, frequent use of the door, or even changes to the structure of the house. The hinges on the door can also experience wear and tear, causing them to shift. Depending on the cause of the problem, it’s best to contact a home improvement specialist to make the necessary adjustments.
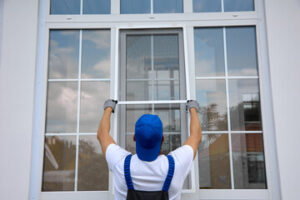
Replacing your door can significantly improve the look and energy efficiency of your home. However, it can be a daunting task to do yourself, especially if you’re not familiar with the process. If you’re not comfortable handling tasks like removing the old casing and exposing the rough opening, it’s best to contact an expert to handle this job.
During the installation process, it’s important to carefully measure the opening for the new door to ensure that it will fit properly. This step is crucial to ensuring that your doors will open and close smoothly. You can do this by measuring the width and height of the rough opening with a tape measure or a ruler.
Once you have the measurements, it’s time to install the new door! Start by removing the old weatherstripping. Then, clean the area and apply the new material according to the manufacturer’s instructions. It’s important to check for a tight seal along the edges of the new door, as well as throughout the entire length of the track.
Before installing the new rollers, you should lubricate them and align them with the track. To do this, remove the door and lay it flat on a work surface. Next, find the adjusting screw located above or around the latch mechanism. Loosening this screw can help you adjust the latch’s projection. Move the screw upward or downward until it aligns perfectly with the receiving holes in your door’s latch hooks.
Once you’ve made adjustments, test the door by sliding it back and forth. It should slide smoothly and have no resistance. Once you’re satisfied with the results, re-tighten the adjusting screws and secure the strike plate.
Dirty Rollers
Over time, sliding door rollers are going to experience a lot of wear and tear. They are constantly slamming against the track and being exposed to a variety of elements. Because of this, it’s important to check them regularly. If they become rusty, it could indicate that your doors are not properly sealing when closed, which can impact your energy costs.
Fortunately, rusty rollers are not the end of the world. In many cases, the problem simply lies in dirt or other debris stuck inside the rollers. It’s fairly easy to fix, and only requires a few tools. Start by removing the plugs that cover the roller adjustment screws on the bottom of your door frame. Once removed, unscrew the adjustment screws, and pull back the rollers. Then, use a brush to remove any debris that is stuck on them. If there is a lot of debris, you may need to scrub the wheels with a wire brush to get it all off.
After cleaning the wheels, it’s time to re-lubricate them. You can use either a silicone spray or a block of paraffin wax. A lubricant will help the rollers slide smoothly and prevent them from jamming. Once the rollers are lubricated, they can be screwed back into place.
Another common issue that can hinder the operation of your sliding door is a bent track. This can make it difficult to open or close the door, and in some cases it can even be unsafe. Bent tracks are often caused by a lack of maintenance or improper installation, but they are easily fixed with minor adjustments.
To fix a bent track, locate the inward-bent section by looking at the gap between the door and the exterior wall. You can pull inward-bent sections of the track back into alignment by using a pair of pliers. If the track is outward-bent, you can use a rubber mallet and a block of wood to straighten it out. Once you have fixed the track, reinstall the rollers and test the door to ensure it slides freely.
Gaps in the Door
If you’re finding that there are gaps creeping in at the very edge of your sliding door where it cozies up to your frame, it could be a sign of misalignment. This can be caused by both wear and tear from daily use and even subtle shifts in the very foundation of your home which may cause the frame to deviate from its original alignment.
This is a common problem and one that can be easily resolved by simply readjusting the roller wheels to correct the height of your door. You can do this by accessing the adjustment screws located on both sides of your sliding door’s rail. These are usually accessible through slots on the edges of your door or by removing any plugs covering them. Then simply turn the screw to raise or lower the roller until it is aligned with the door frame.
Another easy way to help keep your sliding doors in tip top shape is by boosting their insulation performance. You can do this by adding a layer of weather stripping to your door frames which will provide an effective barrier against cold air, drafts, and humidity. You can also reapply the caulking around your door frame if it has begun to degrade, as this will help prevent heat loss and create a more secure seal.
However, if your doors are struggling to slide smoothly and you’re experiencing an excessive amount of draughts or heat loss, it may be time to consider some more drastic measures. Bent tracks can be difficult to repair and may require the assistance of a professional to fix.